] the top right corner of the screen in Mobi when using a module that allows for barcoding.
Warehouse Search and Locate (Barcoding)
Mobi has the ability to use a Barcode reader when locating objects or containers in the system.
In order to use the scanner, we need to make sure the setting “Barcoding Enabled (admin)” is set to “Yes”, for that:
On Moveware, navigate to Administration > System Setup > Groups
Select the Group “Warehouse”
Click on the tab “Settings” and search for Barcoding.
Select “Barcoding Enabled (Admin)” and with a double click, set the value to “Yes”.
Once this setting has been enabled, you will see the icon [ ] the top right corner of the screen in Mobi when using a module that allows for barcoding.
How to Locate Objects/Containers Using Barcoding on Warehouse > Search
Navigate to the Warehouse Menu
Select “Search”
Once the Search screen has opened, we will see on the top right corner the [ ] icon previously mentioned. The icon will appear white on those instances where barcoding can be use; if we wish to deactivate the option temporarily from the screen, you can tap on the icon and it will change to appear greyed out [
 ], indicating that barcoding will not be in use on this screen for now. You can toggle between active and inactive by tapping on the icon again.
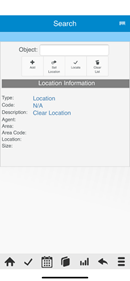
Tap on the white field next to “Object:” whilst the barcode icon is active and scan the barcode of the item (object, container or location) you want to search. To Scan the item you may use any barcode scanner connected (via wire, Bluetooth, wifi or other) to the device
Note: that depending on the configuration of the scanner, the device may show the native keyboard on the screen when you click on this field.
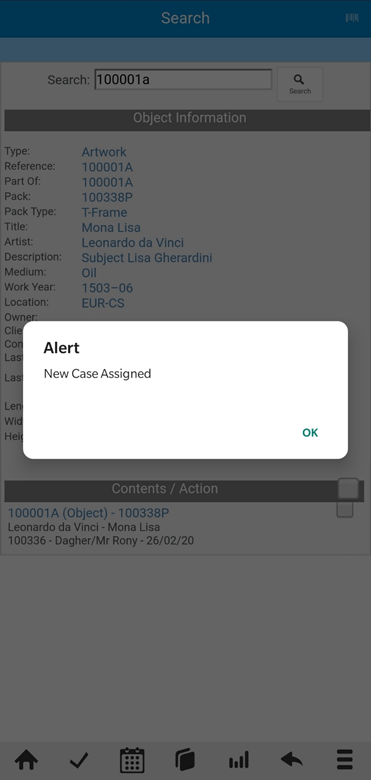
As soon as the barcode is scanned, Mobi will show all the information of the object/container/Location on the section “Object Information” (Please refer to Object Management for more information on how to create and manage objects and containers in Moveware).
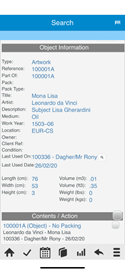
Scroll down and you will see the section “Contents/Action”, where Mobi will display the following:
If you have scanned an Object: Mobi will show a short description of the item selected.
If you have scanned a Container: Mobi will display all the objects currently inside the selected container.
If you have scanned a Location: Mobi will show information about the location and all objects/containers inside it.
By tapping on the Object/Container you will be able to see a series of buttons, most of them very similar to the ones seen on the MobiCrew Inventory Screen and some new ones:
Search Change the Search screen to show only the selected object.
Details Display all the information related to the object selected on a separate screen.
Condition Add a condition report to the Object or Container
Edit Change Details of the Object/Container
Locate Allow for the user to set a new location for the item selected (Barcoding can also be used on this screen) – Mobi will display an alert when modifying the location of the item.
Label Print the label for the item.
Photo Take pictures of the Object/Container
Images Gallery of images taken.
Unpack Object will be taken out of the current Container.

How to locate Objects / Containers using barcoding on Warehouse > Locate
Navigate to Warehouse > Locate
Make sure the Barcode icon is active, tap on the search field and start scanning. Please note you can scan multiple items without having to tap “Add” between them. All scanned items will show under “Total Objects to Locate:” section.
Once all required items have been scanned, select “Set Location”.
Scan the location barcode – Mobi will display information about the location selected and the scanned items on the screen. If any of the items selected was not correct, Mobi will allow for the user to press the minus icon to delete it from the list.
Tap on “Locate” > Mobi will check that all objects scanned are valid and will move them to the new location.
On both above cases, Locations will be updated immediately in Moveware, allowing for a total control of the inventory.
Unpacking Objects in Mobi Warehouse
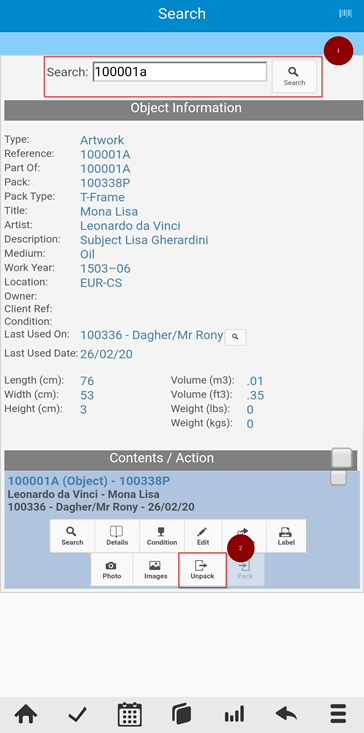
When in Mobi, navigate to the Warehouse menu, and click on “Search”. This will allow you to find an existing object within the warehouse. Once you find an object, and click on it to select it (highlighted in blue), you will see a menu of options appear underneath it. Among the options there you will see an icon for “Unpack”. Note: The option “Unpack” will only be available if the object is already assigned casing/packing.
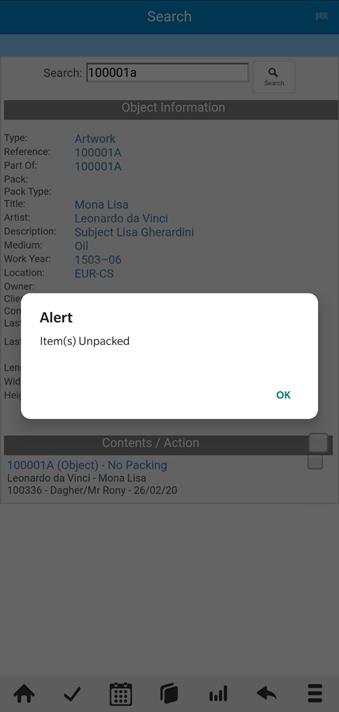
Once you have clicked on the icon for “Unpack”, you will see an alert appear saying “Item(s) Unpacked”. This will allow you to unpack an object from its casing.
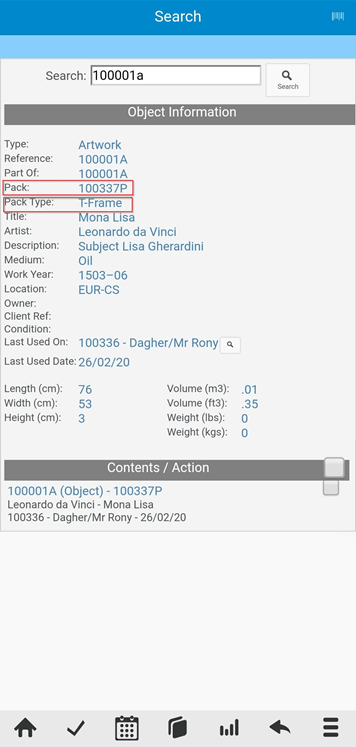
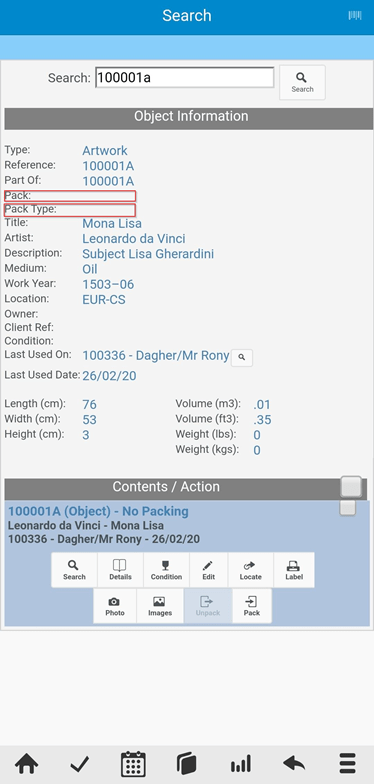
The object will not have a “Pack” or “Pack Type” assigned as the contain/pack type has now been removed. This will indicate for you that the object does not have any casing/packing.
Packing Objects in Mobi Warehouse
When in Mobi, navigate to the Warehouse menu, and click on “Search”. This will allow you to find an existing object within the warehouse. Once you find an object, and click on it to select it (highlighted in blue), you will see a menu of options appear underneath it. Among the options there you will see an icon for “Pack”. Note: The option “Pack” will only be available if the object is not already assigned casing/packing.

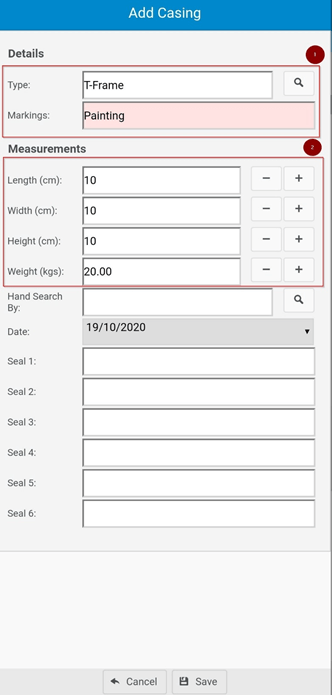
Once you click on “Pack”, a new screen will appear with some fields that will be required to be completed. You need to fill in the Type, Markings and Measurements fields and then click Save.
Once you click OK on the alert and it goes back to the screen showing the object search, you will see that the object now has a new “Pack” and “Pack Type”, to indicate that the object has now been assigned a casing/packing.
Once you click OK on the alert and it goes back to the screen showing the object search, you will see that the object now has a new “Pack” and “Pack Type”, to indicate that the object has now been assigned a casing/packing.