https://youtu.be/A-tLQf62wmw
How to Enter Actual Costs and Post a Purchase Invoice:
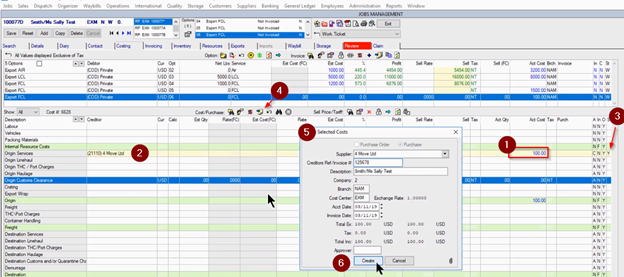
Click on the field in the “Actual Cost” column and enter the appropriate value.
Make sure you have a Supplier assigned to the line; without an assigned Supplier, the system won’t allow you to post a Purchase Invoice.
Double-click the line and ensure this sets the “S” column value to Yes. This means the line is selected.
To post the invoice, select the “Create a Purchase Invoice for the Selected Costs” icon [] from the “Cost/Purchase” toolbar.Note: This step is typically completed by coordinators.
Fill in the details about this invoice as required.
Click Create.
 From here, this purchase will be reviewed by accounting, and the process will continue. Keep in mind that you have only approved the purchase invoice at this point – this step is not posting the purchase invoice to the General Ledger yet.
Once the purchase has been posted by the coordinator, a purchase number is created [Last column] and the purchase invoice status is set to N (or Not Invoiced). The accounting team will approve it and post it to the General Ledger, which changes the status of the purchase to U. The U status indicates the Purchase Invoice is Updated/Posted into the General Ledger. At this point, the Estimated Costs and Sell Prices can no longer be edited.